
Morphological Operations
Morphological transformations are some simple operations based on the image shape. It is normally performed on binary images.
It needs two inputs, one is our original image, the second one is called structuring element or kernel which decides the nature of the operation.
Two basic morphological operators are Erosion and Dilation. Then its variant forms like Opening, Closing, Gradient etc also comes into play. We will see them one-by-one with help of the following image:
Dilation
It is just the opposite of erosion. Here, a pixel element is ‘1’ if at least one pixel under the kernel is ‘1’. So it increases the white region in the image or the size of the foreground object increases. Normally, in cases like noise removal, erosion is followed by dilation. Because, erosion removes white noises, but it also shrinks our objects. So we dilate it. Since noise is gone, they won’t come back, but our object area increases. It is also useful in joining broken parts of an object.
Erosion Tutorial: https://indianaiproduction.com/image-erosion-opencv-python/
Syntax: cv2.dilate(src, kernel[, dst[, anchor[, iterations[, borderType[, borderValue]]]]])
Return: Dilate Image
Parameters:
. @param src input image; the number of channels can be arbitrary, but the depth should be one of
. CV_8U, CV_16U, CV_16S, CV_32F or CV_64F.
. @param dst output image of the same size and type as src.
. @param kernel structuring element used for dilation; if elemenat=Mat(), a 3 x 3 rectangular
. structuring element is used. Kernel can be created using #getStructuringElement
. @param anchor position of the anchor within the element; default value (-1, -1) means that the
. anchor is at the element center.
. @param iterations number of times dilation is applied.
. @param borderType pixel extrapolation method, see #BorderTypes
. @param borderValue border value in case of a constant border
. @sa erode, morphologyEx, getStructuringElement
Dilation of Image Practical using OpenCV
# Import Libraries

import cv2
import numpy as np
# Read Image

img_path_road = r"C:\Users\kashz\AI Life\AI Projects - IAIP, PTs (Web + Channel)\02 OpenCV\000 opencv tutorial\data\images\road\road1.jpg"
img_path_girl_eye = r"C:\Users\kashz\AI Life\AI Projects - IAIP, PTs (Web + Channel)\02 OpenCV\000 opencv tutorial\data\images\girl-eye.jpg"
img_path_iaip = r"C:\Users\kashz\AI Life\AI Projects - IAIP, PTs (Web + Channel)\02 OpenCV\000 opencv tutorial\data\indian ai production name.png"

img_road = cv2.imread(img_path_road, 0)
img_iaip = cv2.imread(img_path_iaip, 0)
img_girl_eye = cv2.imread(img_path_girl_eye, 0)

img_road = cv2.resize(img_road, (600, 400))
img_girl_eye = cv2.resize(img_girl_eye, (600,400))

cv2.imshow("Image road", img_road)
cv2.imshow("Image iaip", img_iaip)
cv2.imshow("Image GIrl Eye", img_girl_eye)

cv2.waitKey(0)
cv2.destroyAllWindows()
# Create Kernel

kernel = np.ones((5,5), dtype = "uint8")
kernel
# Dilate girl Eye Image

dilated_img = cv2.dilate(img_girl_eye, kernel, iterations=1)

img_girl_eye_dilated_img = np.hstack((img_girl_eye, dilated_img))

cv2.imshow("Image", img_girl_eye_dilated_img)
cv2.waitKey(0)
cv2.destroyAllWindows()
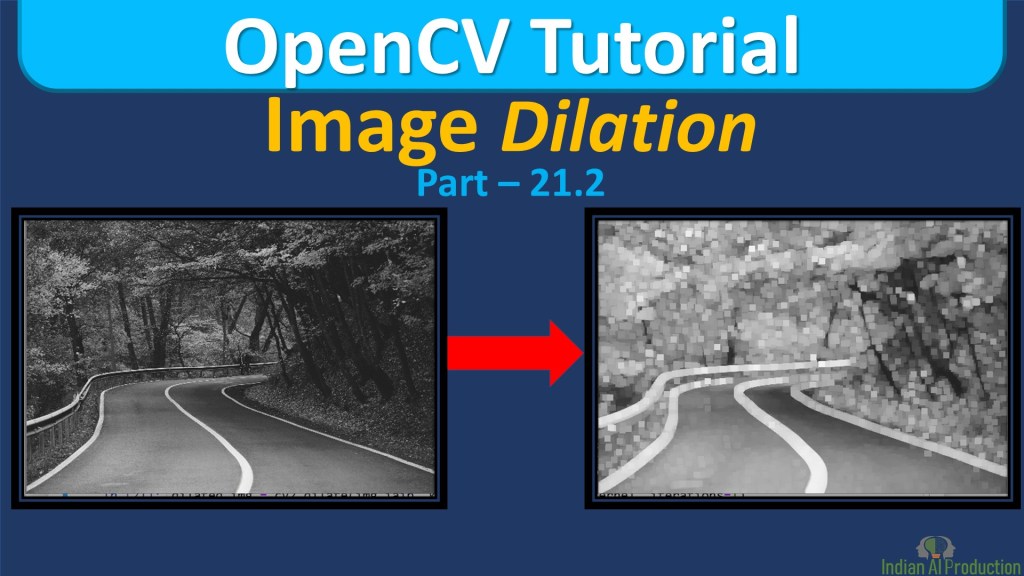
# Dilate Road Image

dilated_img = cv2.dilate(img_road, kernel, iterations=2)

img_girl_eye_dilated_img = np.hstack((img_road, dilated_img))

cv2.imshow("Image", img_girl_eye_dilated_img)
cv2.waitKey(0)
cv2.destroyAllWindows()
# Dilate text Image

dilated_img = cv2.dilate(img_iaip, kernel, iterations=1)

img_girl_eye_dilated_img = np.vstack((img_iaip, dilated_img))

cv2.imshow("Image", img_girl_eye_dilated_img)
cv2.waitKey(0)
cv2.destroyAllWindows()
REF: https://docs.opencv.org/master/d9/d61/tutorial_py_morphological_ops.html